Home

Tuesday, 28 January 2014

Penguins!

Even if I say so myself, I am pretty damn impressed with my sewing skills.
I made two stuffed penguins for the girls!

OK, so I did not do this all by myself... I had a lot of help but I feel quite empowered by this new skill I've acquired. Who knows, I might even have uncovered a hidden talent.

Apologies if you are expecting recipes or food related posts but since I'm in a bit of a food 'slump' I'll be posting about my little side projects which also take place at my kitchen table!


Here is a link to the penguin pattern from Purl Bee. It is a great tutorial but if you are a beginner like myself then it is handy to have friends who know what they are doing!


Friday, 24 January 2014

Books Illustration

Some days I just want to stay in bed and read books all day long.
And have warm coffee.

It's not going to happen but one can always dream and draw.


Wednesday, 22 January 2014

Tandoori Chicken

I was watching BBC1 and came across a cooking show by Simon Hopkinson. He made tandoori chicken and right away I knew that it would make my dinner menu this week. It seemed pretty straight forward and indeed it is. The main thing is having the patience to let the chicken marinate overnight.

I kind of like having something marinating in the fridge, the promise of a meal yet to be made.

The tandoori chicken was good. Not quite as good as in an Indian restaurant but definitely a good weeknight dinner!

One thing I dislike immensely about winter is the fact that all my photos are taken at night. My preference is natural light. And you know that I take my photos as things come out of the oven and are about to be devoured so I really don't have time to fuss around. Instead of a photo you get a little illustration I made of my chicken drumstick of last night.


Here is a link to the recipe on the BBC website. And here is a copy of the original recipe.
Note: this recipe is for quite a large amount of chicken, I just halved everything (except the dip) and it worked just as well!

For the chicken:
1.75kg chicken drumsticks, skinned
pinch salt
2 lemons, juice only
500g plain yoghurt
3-4 tbsp tandoori spice mix

For the dip
3-4 tbsps plain yoghurt
pinch salt
pinch sugar
5 fresh mint sprigs
1 green chilli, deseeded, sliced

Preparation method
Cut deep incisions into the chicken flesh with a small, sharp knife. Place the chicken into a bowl and sprinkle over the salt and the juice of two lemons, massaging into the chicken until well coated. (this is the worst part since I hate touching raw chicken - but just persevere and you will be rewarded!)

Whisk the yoghurt and tandoori spice mix in a bowl until well combined. Pour the marinade onto the chicken and massage into the flesh. Cover with clingfilm and chill in the fridge overnight.
Preheat the grill to high.

Lift the drumsticks from the tandoori mixture and gently shake off any excess. Place a wire rack over a roasting tin and lay the drumsticks upon it. Grill for 20 minutes, turning regularly, or until richly burnished and the chicken is cooked through. Add more lemon juice to taste.

For the dip, place all of the ingredients into a food processor and blend until smooth. Serve alongside the chicken drumsticks.

Monday, 20 January 2014

Adjustable Kids Apron

Ikea is like heaven to me. Not so much to my husband.
That's OK because luckily he doesn't have to go there with me that often - I tend to take Stella and off we go. It's a little outing with free childcare and free coffee.

I have an Ikea sewing machine which I finally used for Heidi's birthday party. I made little adjustable kids aprons. It was funny to use a sewing machine after not touching one for about 20 years! I only know the basics and that was enough. I'm going to get a little 'masterclass' from a friend soon and I'm very excited to be able to do a little more than stitch in a straight line...

I found a pattern on this website. It was more like a guide in terms of the idea because the measurements didn't really make sense to me. I made a little sample to fit on my kids and then the production line started. Of course I bought the material at Ikea and the textile markers too. Nine aprons later I was done.

It is a very basic apron but the kids loved it at the party and this past week we have been colouring them in almost every day. Little colourful aprons. Yay!


Friday, 17 January 2014

Fondant Fun

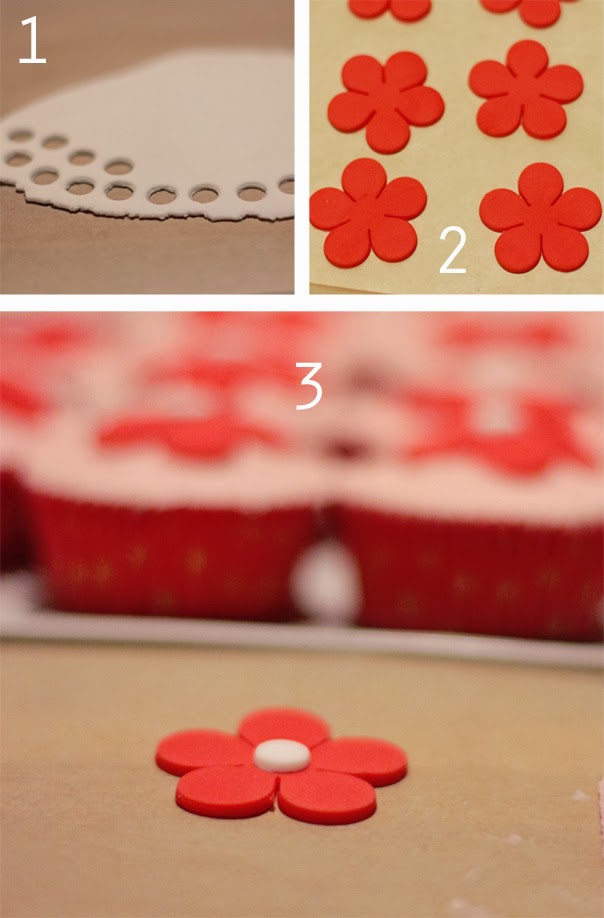
If you are ever at a loss for ideas on how to decorate cupcakes then fondant is your answer.
You can buy it just about anywhere these days.
It comes in a wide range of colours.
And it is just like playing with clay!

Of course it helps if you have a few gadgets / tools/ shape cutters to speed up the process.
I had a daisy shaped fondant cutter which I bought years ago and finally had the chance to use it. I also used my alphabet cookie cutter shapes to cut out Heidi's name. Cool right?
I even gave the kids a piece of fondant to play with and it took them a very long time before they figured out it is edible :-) Of course once they realize it you will have to act quickly and remove the fondant from their sticky little fingers before they eat it all...

Hope you have a fun filled weekend ahead!


Wednesday, 15 January 2014

The Easiest Cookie Dough

This is such an easy cookie dough that I have to share it with you. Three ingredients and that's it.
Flour, icing sugar and lots of butter.

This is the dough I used for Heidi's birthday party and it was a big success. I also felt good about the fact that it did not contain any eggs since these days parents are very fussy about their kids eating raw eggs in dough or batter (not me though!). So I decided to play it safe.

It really is a great dough and the kids loved working with it and eating it. The baking time really depends on how thick you roll out the dough and with 7 kids we had a variety of cookie shapes and sizes. I just let them do what they wanted really. I suggest sticking to basic cookie cutter shapes since the dough tends to spread a little in the oven which is not ideal for intricate designs. The cookies are great as is, or if you want you can always make a thin icing to decorate them.


I found the dough on learning4kids.net and it is definitely a winner!

Here is a link to the recipe and here is a copy:

Ingredients:
300g softened butter
1 cup icing sugar
3 cups plain flour

Method:

  1. Mix butter and icing sugar. 
  2. Add flour and mix well.
  3. Knead cookie dough on top of  baking paper until smooth.
  4. Place in the fridge to rest for 15 minutes.
  5. Roll out flat with a rolling pin on baking paper.
  6. Use your favourite or themed cookie cutters and press firmly onto the flat cookie dough.
  7. Repeat until all dough has been used.
  8. Bake at 180 degrees for 15 minutes or until golden brown.
Make sure you keep an eye on the cookies in the oven since baking time might depend on how thick your cookies are!

P.S. I had some left over cookie dough and added chocolate chips to it, wrapped it in a tube format and stuck it in the freezer for a rainy day. Will let you know how it turns out!


Monday, 13 January 2014

Children's Party Wrap Up

With a big sigh of relief I can say that we survived the children's party on Saturday.

And I can honestly say that it is the last time that I'll be hosting one for Heidi at home.

Here's why:

  1. Our house is not big enough to handle more than 6 children and we had 7 here on Saturday. We don't have a garden, it is winter and the weather was bad so everything happened indoors.
  2. I'm terrible with kids. Really. When I'm around any kids other than my own I just have nothing to say. I then try and mask my discomfort by acting all happy and it is exhausting.
  3. Children's parties = major mess. For example: at some point one of the kids knocked over a bowl of hundreds and thousands and it went everywhere. Imagine a floor covered in a million colours. Guess who had to clean the mess while trying to stay calm... and then our dishwasher broke.
  4. It is a lot of work. This is the kind of thing you pay someone to do. Lesson learnt.

Now that I'm done ranting here are some photos of the party. I'm sure everyone had a good time and that is the most important thing!

P.S. I just have to add that my husband is a rock star. If it wasn't for him I never would have survived the party!


Friday, 10 January 2014

Cookies!

Heidi and I came up with this idea for her birthday party tomorrow.
It is going to be a baking party!

I'm going to make the dough and the kids will get to use cookie cutters to make their cookies.
Let's face it, they are a bunch of 5 and 6 year old kids so I'm definitely not giving them free reign in the kitchen!

I'm busy looking for the perfect dough and have found a couple of recipes which I'll try out this afternoon. Yesterday we played around with Ikea Gingerbread cookie dough.

The kids loved playing with it and we had a lot of fun however when it came to eating the cookies the kids were less than enthusiastic. I get it, gingerbread cookies are not for everyone and it would have been too easy if I could have just bought ready made dough, right? Wish me luck in finding a good dough before tomorrow!!


Have a great weekend!


Wednesday, 8 January 2014

Cupcake Treats for School

I feel like I've been baking every day. Which is not true, it has only been every week but still, I have been baking up a storm.

Heidi turned 6 on Monday and had to take treats for school. So I found a bag of funcakes cupcake mix and decided to cheat a little. You simply need to add (a lot of) eggs and butter to the mix and there you go! The muffins turned out quite well. Heidi wanted buttercream icing in shades of pink, red and purple...  I finished it with the cutest little windmill decorations from the Hema and Heidi loved it.

Since I made and decorated the cupcakes at night and we had to leave for school before sunrise the photos are not great... but you get the idea!


Just in case you missed the recipe last week, here is a copy of my standard buttercream icing:
Ingredients
• 250g unsalted butter, at room temperature
• 500g icing sugar, sifted
• a dash of milk (optional)

Method
In a food processor beat the butter for a few minutes until soft and then add half the icing sugar. Beat until smooth. Now add the rest of the icing sugar and beat until creamy and smooth. If your mixture is too stiff then you might need to add a bit of milk to loosen it slightly.
Add food colouring and beat until well combined.
Have fun decorating the cup cakes!

Monday, 6 January 2014

Flow Magazine Fun

You know how much I love my Flow magazine, don't you?
It is always such pleasure when it arrives at my doorstep. The latest version has a 365 day calendar filled with pretty illustrations and sayings. Of course the chances of me remembering to look at it every day are slim but I did have fun putting it together...

Oh, and a happy birthday to my dear Heidi who is 6 years old today! I'm still deciding what cake to bake for her party this weekend so wish me luck.


Friday, 3 January 2014

Victoria Sponge Cupcakes

A party is not a party unless you have cupcakes, right?
I decided to bake some Victoria Sponge cupcakes based on Jamie Oliver's recipe.
Since I was on a roll with the buttercream icing I could not resist keeping to a rose theme in shades of pink. Pretty predictable but they were a big hit with the kids!


Here is a copy of the recipe mentioned above, except I did not add lemon zest and I used butter cream icing instead of a fruit icing.
Ingredients:
for the sponge
• 225g unsalted butter, at room temperature, plus extra for greasing
• 225g caster sugar
• 4 large eggs, preferably free-range or organic
• 225g self-raising flour, plus extra for dusting

for the buttercream icing
• 250g unsalted butter, at room temperature
• 500g icing sugar, sifted
• a dash of milk (optional)

Method:
• Preheat the oven to 190ºC/375ºF/gas 5
• Beat the butter and sugar together in a food processor, until very light and fluffy
• Add the eggs one at a time, beating each one in well before you add the next
• Sift in the flour and fold the mixture together
• Place 18 paper cake cases into muffin tins
• Use tablespoons to evenly divide the mixture between the paper cases
• Put the muffin tins into the oven and bake for 15 minutes
• You can check to see if the cakes are cooked by sticking a cocktail stick right into one of them
• Remove it after 5 seconds and if it comes out clean they’re cooked; if it’s slightly sticky they’ll need a bit longer, so put them back in the oven for another 5 minutes, or until cooked through and golden on top
• If you cook them for too long, though, they will go dry so keep an eye on them
• Remove the cakes from the tins and transfer to a wire rack to cool

Once cooled you can ice the cupcakes.
In a food processor beat the butter for a few minutes until soft and then add half the icing sugar. Beat until smooth. Now add the rest of the icing sugar and beat until creamy and smooth. If your mixture is too stiff then you might need to add a bit of milk to loosen it slightly.
Add food colouring and beat until well combined.
Have fun decorating the cup cakes!