Friday, 30 September 2011

DWZI - Illustration madness


This week I had my second Illustration class.
I've had illustrations on my mind all week long and then finally Wednesday came, and Wednesday went.

More things to learn, more things to explore and most of all more fun to be had.

The thing I like best about this class is that it challenges you to think outside the box. Do things that you just wouldn't think of.

Monsters and collages, cutting and pasting, colours and creativity.
I still have such a long way to go, but at least I am making a start.


Happy weekend everybody!


Deze week zag ik... this week I saw
(inspired by DezeWeekZagIk on the blogs by Daan en Roos)

Thursday, 29 September 2011

Homage to the Tosti

Every Sunday evening my mom and dad used to make toasted sandwiches for dinner.
Every Sunday evening.

In the Netherlands you can buy toasted sandwiches in almost any restaurant for lunch. It is called a tosti. I do prefer making my own. It is just always better.

It is so simple and easy. Plus I really love our tosti machine. It is big and shiny and makes glorious toasted sandwiches.

Butter the bread on one or both sides, add some cheese, tomato, ham, onions or tuna mayo... anything you like can be toasted on a sandwich!

Place in the tosti machine for a few minutes until the cheese melts.
Serve hot.


Wednesday, 28 September 2011

Restaurant Vuur in Baarn

This restaurant makes the best steak I have ever had in the Netherlands.
It is melt in your mouth good.
Soft and tender.
Perfect.

We were actually on our way to the pancake restaurant but it was so full that we had to find something else. Restaurant Vuur was nearby so we stopped.

It is located next to the Kasteel De Hooge Vuursche, which is beautiful but unfortunately only used for weddings and private parties.

I was a little worried when I noticed that most people were dressed quite smartly, and when I opened the menu I realized why... it is pretty pricey.

But when our food arrived we were very pleasantly surprised. The service was really good and the plate was dressed beautifully. We first received some bread with olives and nuts, followed by an amuse-bouche and then perfect steaks with herb butter, a vegetable skewer and potatoes.

Delicious.

One thing to note is that they do not really cater for small children. And by small I mean under 2. They did not have a baby chair. It's not the end of the world, just a little inconvenient.

We are already planning our next visit to this restaurant, without the kids of course ;-)


Tuesday, 27 September 2011

Brioche Bread and Butter Pudding Experiment

I had a lot of Brioche when I came back from Paris.
Way too much.

So I decide to use up most of it in an experiment.

Since I've never eaten nor made bread and butter pudding, I figured why not now?

I didn't really think it through that well... and I had to make do with the ingredients that I had in the house so all in all it wasn't exactly perfect. But it tasted good and next time it will be even better!

Lessons learnt:
- Make enough custard to cover the  bread in your baking dish OR use a smaller dish. This is critical - the bread must be COMPLETELY covered.
Mine wasn't and the top layer turned out too dry - edible but just plain dry.
- Serve it with something like fresh cream or ice cream. We didn't have any in the house and I felt like the dessert needed that additional element.


Ingredients:
2 cups milk - heated to boiling point
1/4 cup butter
2 eggs, lightly beaten
1/2 cup sugar
1 teaspoon vanilla extract
1 teaspoon cinnamon
enough day old brioche to fill a square or rectangular oven dish with about 2 layers of bread

Method:
Preheat the oven to 180 degrees Celsius. Lightly grease an oven dish and set aside.
Stir the butter into the hot milk until it has melted. Add 1/4 cup of the butter-milk mixture to the eggs and whisk them until the mixture is well blended. Add the warmed egg mixture back into the hot milk and whisk in the sugar, vanilla and cinnamon until the mixture is smooth.
Spread the brioche into the prepared dish, pour the custard over the brioche until it fills the dish. Bake it for 40 minutes, until the top is browned and a knife inserted comes out clean. Serve it warm with whipped cream or ice cream.


Here is a link to the recipe I used as a starting point. 


Monday, 26 September 2011

Sunday, 25 September 2011

Illustrations, Illustrator?

I started a course this week.

12 lessons to learn how to illustrate. From now on my Wednesday evenings are booked.

It might not come across that way, but if you could see my face then you would know that I am SUPER excited about it.

I've always been able to paint and draw but ILLUSTRATE now that is a different thing all together.

Our first lesson was pretty basic, but it whet my appetite and I can't wait for next week.

My teacher is Kim Welling and she makes very cool illustrations. 

Lucky me, yet another adventure!

So after feeling inspired I doodled on Adobe Ideas on my iPad. 

Yes, there is definitely an illustrator in me.... 


An illustrator with a sweet, sweet tooth.


Thursday, 22 September 2011

DWZI - Lunch at Le Cordon Bleu

So there we were, exhausted from slaving away at making croissants in the big industrial kitchen at Le Cordon Bleu. Listening attentively to Chef Xavier Cotte announcing that it is time for lunch.

Well, the translator told us what he said since he was speaking in French.

I welcomed the break because I am not used to standing on my feet for hours at end (shame on me!).

We headed to the lunch room and there we found a table laden with French treats. Fresh fruit, melon with parma ham, a big selection of cheese, pate's, shrimps with avocado, beef terrine, salmon terrine, tomato with mozzarella and pesto, bread and of course red and white wine.

Happiness!

The French certainly know how to have a lunch break :-)


Deze week zag ik... this week I saw
(inspired by DezeWeekZagIk on the blogs by Daan en Roos)

Wednesday, 21 September 2011

The Rest Stop Shop

Driving to Paris took longer than we expected. There is simply nothing to be done when you are stuck in traffic but at least we had time to stop for a few minutes and stretch our legs.

We were somewhere, in France, on the road to Paris at a big Rest Stop.

It was fun browsing in the shop, something different to the usual bread and cheese in the Netherlands!


Tuesday, 20 September 2011

Croissants!

Le Cordon Bleu is a world renowned culinary institution and I was lucky enough to attend a workshop on French pastries at their Paris campus.

Two of my fellow foodie friends joined me for a weekend in Paris and it was great!

The workshop was everything I expected and more. It is not quite as easy as you might think to make croissants and brioche... in fact, it is very hard work.

The chef, Xavier Cotte, was hilarious. He is not just a funny guy, oh no, he is also a very a talented pastry chef! We were so lucky to be able to learn from him. He was patient as he demonstrated all the techniques, and even more so when he walked around the class helping us with our own attempts.

We had a translator since the chef spoke only French. Amazingly the language barrier is no problem when it comes to food.

I contemplated posting the croissant and brioche ingredients and the recipe, but I decided against it.  All I will say is that there is more butter in them than you imagine... lots and lots of butter.

You really had to be there, see it, make it and taste it for yourself.


Monday, 19 September 2011

Heavenly Hydrophobe

I went to Paris with two good friends to attend a pastry workshop at Le Cordon Bleu.
Just writing the words, Le Cordon Bleu, makes me happy.

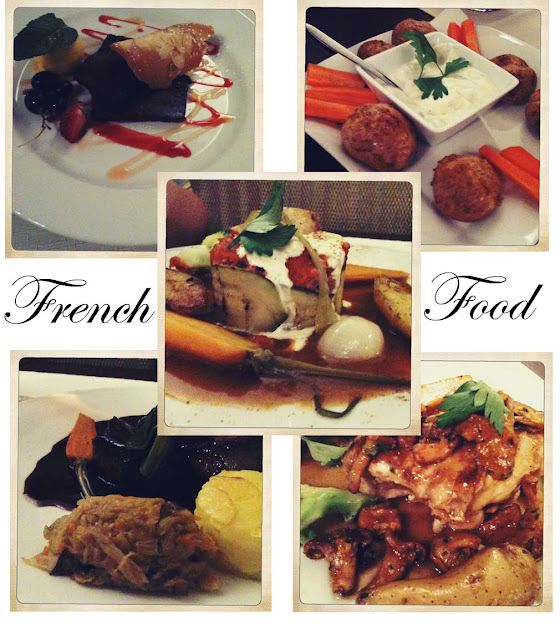
What made me just as happy was the dinner we had at Restaurant L'Hydrophobe.

It was glorious and delicious traditional French cuisine and the service was great.

We asked the concierge at the hotel for a suggestion nearby and he deserves a gold star for this recommendation. Not only was the food fantastic, but the prices were extremely reasonable and they had a 3 course menu for 35 euro per person.

Everything on the menu is in French, but our waiter kindly translated for us.

I had a chicken dish, soft and perfectly cooked with a subtle sauce, seasonal mushrooms and beautiful vegetables. My friends had steak in a red wine sauce, and slow cooked lamb respectively. We were all in heaven.

Then we ordered dessert, of course.

Chocolate fondant with sorbet... melt in your mouth yummy.

I can gladly recommend Restaurant L'Hydrophobe to anyone who finds themselves in Paris, France!


Sunday, 18 September 2011

A Vegetarian Weekly Menu

This week we are going to have all vegetarian dinners!

After such indulgence in Paris, and a bit of a pastry overdose, it will be refreshing to put the focus on vegetables.

Here is a list of the dinners I plan on making from Monday to Friday this week, the order is yet to be finalized :-)


Friday, 16 September 2011

DWZI - Crazy Stupid Love

This week I saw... dinner and a movie with my husband!

We went on a date :-)

It feels like we never get the chance these days, you know, to go out 'alone'. The kids can be all consuming, eating every minute of your time and energy. Plus there is work and just life in general. And then you look at the clock and it says 11pm, and another day is gone.

But not on date night!

We had gorgeous tapas at El Olivo and then saw Crazy Stupid Love.
What a lovely movie. I really enjoyed it.

The best part though was sitting next to my husband, with my little hand in his big hand, just enjoying the moment.

Here is a little mosaic heart which I made this week - in the spirit of love!


Deze week zag ik... this week I saw
(inspired by DezeWeekZagIk on the blogs by Daan en Roos)


Thursday, 15 September 2011

Tapas at El Olivo

Hmmmmm... Tapas!

My husband and I had a table full of glorious tapas at El Olivo in Utrecht.

The restaurant is very new, and is located in a little alley, just off the Oudegracht.
A friendly host welcomes you and the restaurant itself has a warm and cozy ambiance.

We were in a bit of a rush and they were more than happy to accommodate us, we managed to leave exactly on time.

The food was spicy and delicious. We had a variety of tapas including bread with Aioli, Spinach pastries, marinated olives, grilled vegetables, Serano ham with melon, meatballs in a tomato sauce, chicken pieces in a 'romesco' sauce,  patatas bravas, etc.

Enjoy with a glass, or two, of sangria and the evening will be complete :-)

Wednesday, 14 September 2011

Chicken, Tomato and Fennel Casserole

I am absolutely crazy about Bill Granger. I love his books, I love his TV shows and I love his recipes.

One of my favourites is his chicken, tomato and fennel casserole. It is delicious and easy to make, like all his recipes. This recipe comes from his book called "Every Day".

Serve it with potatoes, serve it with rice or serve it with garlic bread. It doesn't matter what you serve it with as long as you make this lovely dish.


Ingredients
2tbsp olive oil
8 chicken thigh cutlets on the bone, with skin
1 onion, sliced
1 large fennel bulb, trimmed and thinly sliced
2 garlic cloves, crushed
½tsp crushed fennel seeds
2tsp paprika
½ tsp saffron threads, soaked in 1tbsp water
Wide strip of orange rind 400g (14oz) tin chopped tomatoes
500ml (17fl oz/2 cups) chicken stock
1 red pepper (capsicum), roasted and thinly sliced
2tsp honey
Sea salt
Freshly ground black pepper

Method
Heat the oil in a large heavy-based pan over a medium-high heat. Add the chicken (in batches, if necessary) and brown for 2-3 minutes on each side. Remove from the pan and set aside. Drain most of the oil from the pan, leaving about 1 tablespoon.

Reduce the heat to medium and add the onion and fennel to the pan. Cook, stirring occasionally, for 7-8 minutes or until the vegetables are soft.

Add the garlic, fennel seeds and paprika and cook, stirring, for another minute. Add to the pan the saffron with its liquid, the orange rind, tomatoes, stock and pepper, and stir well. Return the chicken pieces to the pan, bring to the boil and then reduce the heat to low. Cover and simmer for 30 minutes, or until the chicken is cooked through and tender. Skim any oil from the top of the casserole. Stir in the honey and season with salt and pepper. 


Notes:
- I substituted the red pepper with mushrooms
- I couldn't find saffron at my local shop so I left it out.
- I used chicken drum sticks instead of thighs, since that was what I had in the fridge!

Tuesday, 13 September 2011

Pita Pizzas for the Kids

Sometimes my dinner choice does not work for the kids... that's when I make something quick and easy to serve along side our dinner.

Pita pizzas are the easiest thing you can make and it will take about 15 minutes.

Ingredients:
Pita breads
Tomato ketchup or tomato puree
Grated cheese (My kids prefer a young cheese, but cheddar or similar will work just fine)

Method:
Switch on your oven and set it to grill (250 degrees Celsius).
Remove pita's from their packaging and spread the flattest side with a bit of tomato ketchup.
Sprinkle some grated cheese on top and place under the grill for about 10 minutes.
Keep an eye on the oven and remove when the cheese has melted.

Cut in quarters, let it cool and serve to hungry kids.


Monday, 12 September 2011

Homemade Hummus

hummushoummoshoumous [ˈhÊŠmÉ™s]
n
(Cookery) a creamy dip originating in the Middle East, made from puréed chickpeas, tahina, etc.
[from Turkish humus]

Collins English Dictionary – Complete and Unabridged © HarperCollins Publishers 1991, 1994, 1998, 2000, 2003

Hummus is a favourite in our house. You can buy hummus these days in almost every grocery store but I think there is something really special about making it yourself. Plus it is dead simple!


You need a can of chickpeas, two tablespoons tahini (sesame seed paste), 4 tablespoons lemon juice, two cloves of garlic (crushed), one and a half tablespoon extra virgin olive oil, salt and some paprika powder.

The basic ingredients can be modified in volume depending on your own individual taste. You might even want to start by using less lemon juice and garlic than I did and then add more if you need to.

Drain the chickpeas and place into a food processor. Add the tahini, lemon juice, garlic, half the olive oil, a dash of salt and mix together at full speed to get a nice smooth paste. Add a tablespoon or two of water if you need to get the hummus a bit smoother. Taste and decide if you need additional lemon juice or garlic.

Serve it in a bowl, drizzle the rest of extra virgin olive oil over the hummus and sprinkle a little bit of paprika on top.

You can enjoy it with just about anything. We usually eat it with bread, pitas, or as a dip with vegetables and chips.  Yummy!


Sunday, 11 September 2011

Weekly menu

Here is what I have planned for the week ahead... let's see how it goes!


Friday, 9 September 2011

DWZI - Digital Scrapbooking!


I had a little fun with digital scrapbooking!


Thank you to all the fabulous free resources out there :-)
I made use of:
Puglypixel, Maybemej, Fonts for Peas and Jessica Sprague


Happy weekend everyone!


Deze week zag ik... this week I saw
(inspired by DezeWeekZagIk on the blogs by Daan en Roos)

Thursday, 8 September 2011

Lunch Time Salad

Yes, I'm back on the wagon.

The 'no more cheesecake' wagon.

The 'do not buy that chocolate bar' wagon.

The 'thou shalt not eat dairy' wagon.

And it is tough.

But the fact that I've gained a few kilograms made me realize that I really have to watch what I eat because my weight gain is directly related to what I eat (duh!). So I have to stop baking for a bit, and focus on healthy food.

A salad seemed like a very healthy and delicious way to start this journey.
I felt lighter just by looking at it.

This salad had lettuce, tomato, cucumber, onion, pine nuts, pineapple, olives and a light dressing which I made from mustard, balsamic vinegar and a dash of extra virgin olive oil.


Let the games begin...

Wednesday, 7 September 2011

Garlic Bread with Vegetarian Pasta

I just love garlic bread.

I will find any excuse to make it, add it to a meal and eat it.

Garlic bread goes really well with just about anything, but I especially love it with a barbecue or with some pasta. Yum yum yum.

All you need is a french loaf, butter and a few cloves of garlic.

Switch on your oven to grill. Melt the butter (I leave it up to you how much you want to use, I usually use about 75 gr or so). The easiest way to melt butter is in the microwave - but start slowly since it melts really quickly!

Peel and then crush the garlic. Add it to the melted butter and stir. Now let it stand for a couple of minutes while you slice the french loaf.

Drizzle the garlic butter over the sliced loaf and then place on a baking tray in the oven for more or less 10 minutes. Remember to check the bread every couple of minutes since you don't want to let it burn!

Remove from the oven and enjoy!


We had our garlic bread with a lovely vegetarian pasta and tomato salad. I used an olive ready made pasta sauce which I found in the Lidl, combined with some tomato passata, onions, mushrooms, courgette and Parmesan cheese. Simple and delicious.

Tuesday, 6 September 2011

A morning at the beach

Saturday morning we woke up early to go to the beach. The weather forecast was good - sunshine!

That's one of the great things about living in the Netherlands. We live in the middle of the country and yet the beach is but an hour away. Yay!


We basked in the sun, got our toes wet and then had lunch at a beach restaurant called Beach club de Golfslag.

Given that it was a very busy day at the beach, our expectations were not high. We ordered our sandwiches and bitterballen and hoped for the best. We were pleasantly surprised. The food came quickly and was good enough to make us feel satisfied.


I can definitely recommend Wassenaarse slag for a day at the beach, especially when there is a bit of sunshine to brighten your spirit.


Monday, 5 September 2011

The Best Baked Cheesecake

About the only television programme I follow these days is Masterchef Australia. Last week I was sort of watching it while making dinner and dealing with the general chaos created by two very small kids. It was a masterclass episode and they were making cheesecake...

Now you might not believe it, but I have never made a baked cheesecake before. I have eaten many slices of cheesecake but for some reason I never got around to making one myself.

So I decided there and then to make a cheesecake, while my parents were still in town so that I had someone to share it with!

It turned out to be dead simple. The masterchef recipe is a winner - it is from Donna Hay and she is just fabulous. Trust me, if I can make this cheesecake then you can make it :-)

The cake had a crack on top, but there are a number of reasons why that might happen, like baking it slightly too long, and luckily it did not impact the taste. The trick is to let it refrigerate overnight.

My cheesecake was glorious. It had the perfect balance of lemon and vanilla. It was rich and had a smooth texture. We were all in cheesecake heaven, I even forgot to decorate it with strawberries and nobody noticed. It was that good.


Here is a link to the recipe.

Here is the copy of the recipe:

Ingredients:

Base
1/3 cup ground almonds (almond meal)
¾ cup plain flour
¼ cup caster sugar
90g chilled butter, chopped


Filling
330g cream cheese, softened
500g fresh ricotta
4 eggs
1 1/3 cups caster sugar
1 tablespoon grated lemon rind
¼ cup lemon juice
½ teaspoon vanilla extract
1½ tablespoons cornflour
1½ tablespoons water

Strawberries and raspberries, to decorate


Method:
1. Preheat oven to 150°C.

2. To make the base, place the ground almonds, flour, sugar and butter into a bowl. Rub mixture with your fingertips until it forms coarse crumbs.

3. Line the base of a 20cm spring form tin with non-stick baking paper. Place the base mixture in the tin and press gently with fingers until even and then smooth out with the back of a spoon. Bake for 15 minutes or until light golden, set aside.

4. To make the filling, place the cream cheese, ricotta, eggs, sugar, lemon rind, juice and vanilla in a food processor. Combine the cornflour and water until smooth and add to the cheese mixture. Process the mixture until smooth.

5. Grease the sides of the cake tin with a little butter and then pour the filling over the base. Tap lightly to remove any air bubbles. Bake for 1 hour. Turn the oven off and stand the cake in the oven for 1 hour, leaving the door closed. Refrigerate until cold and serve with fresh berries.


Friday, 2 September 2011

DWZI - Efteling!

Yes, we did it again... a trip to the Efteling!

Heidi has been asking to go for months and my parents are visiting, so who could resist?

It is such a wonderland, filled with fairy tales and fun rides.

However, it can get very busy. The only place where we waited in a very, very, very, very long line was for a ride called the "droomvlucht". I am quite amazed that Heidi managed to stay calm during the one hour wait... but she did. And the ride was pretty awesome.

All the other rides we went on had at most a five minute wait, if that.
I even had a chance to scream and giggle like a child when we went on a roller coaster ride!

Oh the joy of being young and believing in fairy tales, even if it is just for one day.


Deze week zag ik... this week I saw
(inspired by DezeWeekZagIk on the blogs by Daan en Roos)


Related Posts Plugin for WordPress, Blogger...