Thursday, 31 May 2012

Brown Sugar Cookies

I baked these cookies simply because I have had a bag of dark brown sugar in my cupboard for months now. Its been sitting there, pretty much just in my way.
I don't even remember why I bought it in the first place.

I found a brown sugar cookie recipe on Joy the Baker's site.
It seemed pretty simple so I figured why not?

Only, I made a few mistakes along the way. So my cookies don't quite look as good as her cookies.
I forgot to add the egg.
I just forgot.
So it got added at the very end.
It should be OK, right?

Don't get me wrong.
The cookies are good.
The subtle cinnamon and ginger flavour is lovely.
I just wanted them to look prettier.
But hey, it's not all about looks!

If you make them do let me know how they turned out.


Here is a link to the recipe on Joy the Baker.

Here is a copy of the recipe:


Brown Sugar Cookies

makes 2 1/2 dozen cookies
from Epicurious September 2011

Ingredients:

2 cups all-purpose flour
2 teaspoons baking soda
1/2 teaspoon salt
1/2 teaspoon ground cinnamon
1/2 teaspoon ground ginger
1 1/2 sticks (6 ounces) unsalted butter, softened (170 gram)
1 1/4 cups dark brown sugar
1 teaspoon pure vanilla extract
1 large egg

In a medium bowl whisk together flour, baking soda, salt, cinnamon, and ginger.  Set aside.

Place butter and brown sugar in the bowl of an electric stand mixer.  Beat on medium speed until light and fluffy, about 3 to 5 minutes.  Stop the mixer and scrape down the sides of the bowl.  Add the egg and vanilla extract, and beat on medium speed for one minute more.

Add the dry ingredients, all at once, to the butter and sugar mixture.  Beat on low speed until the dough begins to come together  and the flour disappears.  Stop the mixer and finish incorporating the ingredients with a spatula.  Once all the flour is thoroughly mixed in, cover the bowl with plastic wrap and refrigerate for 30 minutes.

Place a rack in the center and upper third of the over and preheat oven to 350 degrees F (180 degrees Celsius).  Line two baking sheets with parchment paper.  Dollop tablespoons size balls of dough onto the baking sheet.  Bake cookies for 10 to 12 minutes, or until lightly browned around the edges.  Cool on the pan for 5 minutes, before transferring to a wire rack to cool completely.  Cookies will last, in an airtight container at room temperature, for up to 5 days.

Wednesday, 30 May 2012

Salad Days

As the season changes I find myself craving salads.
Fresh lettuce, cucumber, tomatoes, onion and best of all avocado.
Mix it all, add a dressing, sprinkle Parmesan cheese on top...
Glorious salad days!


Tuesday, 29 May 2012

Tiramisu

I've been wanting to make Tiramisu for a while now and I was quite happy to have an occasion to make dessert when we invited the neighbours over for dinner.

There are so many variations of this classic desert.
I spent almost an hour looking for an 'easy' version online and in my cookbooks.
Eventually I settled for this recipe.
It was the right choice.

The recipe was for one big Tiramisu but I decided to make 6 individual portions in glasses. Good idea. Worked like a treat and tasted great!

This is definitely going to be my basic Tiramisu recipe.
Wonder what I will experiment with next...


Here is a link to the recipe by EmmaMedu.

Here is a copy of the recipe:

Easy Tiramisu: The Best Tiramisu Recipe

Ingredients:
250g mascarpone
120g ladyfingers to cover the bottom of the bowl
3 fresh eggs, separate 3 egg yolks and 2 egg whites
70g brown sugar
0,5 cup Espresso coffee
1 tablespoon rum / Amaretto
Cocoa powder

Instructions:
Make the espresso and put it in the bowl where you will soak ladyfingers.
Pour one tablespoon of rum / amaretto and let it cool.
At the same time, mix egg yolks and sugar in the separate bowl.
Beat the egg whites until peaks form.
Add mascarpone to the mixture of egg yolks and sugar.
Add slowly beaten egg whites with the wooden spoon.
Mix everything to make thick mixture.
Soak the ladyfingers in the coffee mixture.
Break the ladyfingers into bite size pieces so that they will fit into the bottom of a glass.
Cover them with thick yellow mixture. Repeat with another layer of ladyfingers and mascarpone.
At the end, sprinkle the whole surface with cocoa powder.
Put it in the fridge to cool for 24 hours.


Monday, 28 May 2012

Kitchen Extension

I thought I'd give a little bit of an update on our kitchen extension.
It is going to take months (yes, months) to finish it... but we are saving a lot of money by doing all the work with the neighbours.


Normally I am not a patient person.
This one time I am making an exception ;-)
It really is for a good cause and slowly but surely my excitement about our bigger kitchen is growing.

Plus let me tell you how impressed I am with my husband.
He works in a corporate environment every day, always wears a suit and is glued to his laptop.
Somehow he managed to turn into the best handy man ever.

Lucky me!

Saturday, 26 May 2012

Vegetable Patch #6

I'm really impressed with our vegetable patch.
It is a pleasure to tend to it, and of course to harvest from it.
Right now we are in the middle of a kitchen extension and it is surrounded by rubble.
Somehow it just continues to grow.


Today you will find me at the zelfgemaakte markt in Utrecht.
Come and say hello if you are in the neighbourhood!

Friday, 25 May 2012

DWZI...

This week I saw misty mornings, rain, traffic jams and glorious sunshine.

I also worked like a maniac to get things done.
There is never enough time... or perhaps I procrastinate?
Either way, I'm just about ready for tomorrow.

I especially love the cross I made, so if it doesn't get sold then I'll be finding a home for it in my own house :-)


Heidi loves the hearts.


Wish me luck!

You can find the Deze Week Zag Ik participants here.

Thursday, 24 May 2012

Grilled Chicken and Vegetable Salad

It was the usual question.
What am I going to make for dinner.
I had chicken breasts, I had asparagus and I had a lime.
Of course I had a whole lot more than that but I really wanted to use the chicken, asparagus and the lime!

I browsed the Delicious Magazine website and stumbled across two potential recipes. I improvised and used a bit of this one and a bit of that one.

I was happy with the results and so was my husband!


Ingredients:

3 skinless free-range chicken breasts
Juice of 1 lime and lime zest
½ garlic clove, crushed
1 tsp ground cumin
1 tsp ground coriander
1 tsp paprika powder
½ tsp chilli flakes (optional)
2 tbsp olive oil
1 red onion, sliced
1 courgette, chopped
2 carrots, peeled and chopped
12 - 15 asparagus spears
2 cups arugula lettuce
60 gr couscous

Method:

Place the chicken breasts between sheets of cling film and carefully flatten with a rolling pin until they are 10mm thick. Place in a dish with the lime juice, the lime zest, garlic, dried spices and one table spoon olive oil. Cover and leave to marinate in the fridge for an hour or two.

Preheat the oven to 200 degrees Celsius. Place the chopped courgette, carrots and onions into an oven proof dish, season and drizzle some olive oil on top. Roast in the oven for approximately 40 minutes.

Prepare the couscous as per the instructions on the packaging.

Trim the asparagus and drizzle with olive oil.

Heat up your grill (I use an electric grill which looks a little like a George Foreman Grill!).
Now place the asparagus on the grill and let it cook for 3 to 5 minutes.
Next cook the chicken breasts on the grill - it shouldn't take long, but it entirely depends on your grill.

Combine everything, including the arugula, and enjoy a very healthy and tasty salad!


Wednesday, 23 May 2012

Dinner with the Neighbours

We are right in the middle of extending our kitchen.
Luckily we are not doing it alone.
It is a collaboration with our neighbour.
He has a lot of experience in building (lucky us!).

To thank him for the effort so far we invited him and his girlfriend over for dinner.
Of course I made Bill Granger's curried chicken rice.
A big salad, ciabatta bread and tiramisu for dessert.
Gezellig!


Tuesday, 22 May 2012

Ice Cream at the Hema

I love shopping at the Hema.
They always have the most colourful patterns on their clothing, especially the baby stuff. Don't even get me started on the stationery.
We found ourselves in the Hema buffet restaurant with the kids.
Heidi wanted ice cream.
Ice cream she got.
In the shape of a polar bear.
Stella ate most of it though... 
That didn't matter, both kids were happy and so were we.


Monday, 21 May 2012

Samoa M&M Blondies

Did I tell you that I went to join the gym?
Yes, I made it all the way to reception.
There they told me that unfortunately the system was down, I should come back some other day.
Seriously?

So instead of joining the gym I continue to bake.
It's kind of my own very special exercise.
Let me tell you that baking with two small children has its challenges...

I decided to bake Samoa M&M Blondies, but I did not have all the ingredients so mine turned out looking more like brownies.

They were pretty good.
Very, very, very sweet and unfortunately very addictive.
I'm definitely still thinking about joining the gym.


Here is a link to the recipe on Eat at Allies blog. Go and check out the original recipe.

Here is my improvised recipe with the ingredients I had available and I converted everything into metric measurements.

Note: I improvised extensively and I will probably never be able to recreate it exactly as it was today!! Also it is best eaten on the day you bake it.

Ingredients:

281 gram unsalted butter
350 gram packed brown sugar
112 gram granulated sugar
2 large eggs
4 teaspoons vanilla extract
1/2 teaspoon salt
375 gram all-purpose flour
100 gram desiccated coconut (Next time I will add more)
250 gram M&Ms (with a few reserved for the top)

Method:

Preheat oven to 180 degrees C. Line a 9×13 inch pan with baking paper.
Heat butter in a small saucepan over medium heat until it browns and begins to smell nutty (watch it closely so it doesn’t burn). Allow the butter to cool slightly.
In a large mixing bowl, combine the browned butter and sugars.
Stir in eggs, vanilla and salt.
Add the flour and stir just until combined.
Add  the coconut and M&Ms and stir to combine.
Pour the batter into the prepared pan and smooth the top with a rubber spatula.
Sprinkle a few additional M&Ms on top.
Bake for 25 to 30 minutes.
Let the blondies cool completely before turning them out onto a cutting board and slicing into squares.

Enjoy!


Friday, 18 May 2012

DWZI - Preparations

And so I find myself counting down the days to the zelfgemaakte markt.
I'm getting a little worried because 26 May is really not that far away!

Every evening after the kids are in bed and the grownups have been fed I make myself comfortable and work on small pieces for my stall.

I'm hoping that someone will like my little hearts... made with lots of love of course.
Hopefully I get a chance this weekend to finish them.

Have a lovely weekend!


You can find the Deze Week Zag Ik participants here.

Thursday, 17 May 2012

Boerenappelcake

This is the BEST apple 'cake' that I've ever made.
I simply love it.

It is easy to make and delicious.
Yum, yummy, yum yum yum.

Now the only question is... when can I make it again?


I stumbled on the recipe on twitter via culy.nl.
It is in Dutch so here is a translation into English:

Ingredients:

200 gram unsalted butter at room temperature
225 gram sugar
dash salt
3 eggs
200 gram flour
10 gram baking powder
3 tablespoons /45 ml milk
2 (big) apples
1 teaspoon ground cinnamon
icing sugar
bake or brownie dish (28 x 18 cm) covered with baking paper

Method:
Heat the oven to 180 °C.
Beat the salt, butter and 200 gram sugar until well mixed and soft.
Now beat the eggs into the mixture one by one.

Sift the flour and baking powder into the mixing bowl and mix it all to a smooth batter. Add the milk and give it one last mix. Pour the batter into the oven dish and smooth it out.

Peel the apples and cut into squares. Mix with 25 gram sugar and cinnamon.
Sprinkle the apple pieces over the batter.

Bake the apple cake in the oven for about 40 minutes until golden brown and cooked through.
Let the cake rest in the dish and once it has cooled down you can sprinkle icing sugar over the top.

Cut into pretty squares and enjoy!


Wednesday, 16 May 2012

Butternut, Spinach and Caramelized Onion Pasta

This pasta dish turned out to be just lovely.

It started off with me having some fresh spinach and not knowing what to do with it.
Then I remembered something which I saw on pinterest (you just gotta love pinterest!)
It was a lasagna with squash, onions and spinach.
Since I did not have most of the ingredients, I improvised.

My recipe below is for one very hungry person, but can easily be adapted for more.

I roasted a medium sized butternut, while at the same time caramelizing one onion. The idea was that they should be done within 40 minutes and the timing worked out well.
Halfway through cooking the onion I added half a clove of crushed garlic.
Oh the smell... it was mouthwatering.
I cooked my spaghetti (100grams) and also sauteed two big hands full of spinach.
When everything was done I used about half the butternut and saved the rest for another day.
Then I poured 100gram demi creme fraiche onto the spaghetti, mixing it well and to this I added the onions, butternut and spinach.
Lastly I grated Parmesan cheese over the pasta.
Yum.


Tuesday, 15 May 2012

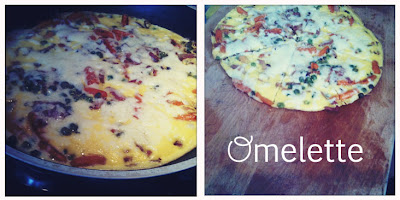
Kids Food #19 - Vegetable and Bacon Omelette

Eggs just seem to be my fall back dinner for the kids.
You can do so much with eggs.
Boil, fry, scramble and of course make an omelette.


This omelette was pretty basic since the fridge was very empty...

3 eggs
dash of milk
hand full of grated cheese
half a cup cooked bacon, chopped
half a cup of frozen vegetables (peas and carrots)

Simple beat the eggs and milk, pour into a hot pan.
Add the bacon and frozen vegetables.
Turn down the heat and let it cook for a few minutes.
Sprinkle the cheese on top and hold the pan under a hot grill until the cheese melts.
Cut into slices and serve up!


Today is my Mom's birthday.
Gelukkige verjaarsdag Ma!!
xxx

Monday, 14 May 2012

Banana, Oats and Chocolate Chip Cookies

Yes, I was thinking about posting a weekly menu, but then at the last moment I couldn't resist sharing this cookie recipe with you. Have a look at the photo... I am practicing my 'food photography' skills!

Once again I found myself with one very ripe banana.
Only one.

I decided that this one banana will be used in cookies.
Banana and Oats cookies seemed like a good idea, although the recipe called for two bananas.
One worked fine. Of course one mustn't forget the chocolate chips!

It was a hit with the kids and grown ups alike, and very easy to make. In fact, Heidi did most of the work ;-)


Here is a link to the original recipe and here is a copy of it, converted to metric measurements:

Ingredients:

227 gram porridge oats
2 ripe bananas (I used only one)
227 gram brown sugar
1 tsp baking powder
1/4 tsp salt
113 gram margarine
1 beaten egg
(optional - 28 gram dark chocolate chips)

Method:
Mix dried ingredients together.
Mash the banana.

The bananas form PART of the 227 gram of sugar, they aren't in addition to it! So you place the 2 bananas on the scales and then make up the weight to 227 gram with brown sugar. (I used only one banana so I had to use a little more sugar)

Melt margarine in a saucepan and add to dry mix. Blend thoroughly.

Use a teaspoon to drop walnut size blobs onto a greased baking tray (I use greased greaseproof paper as well), allowing space for cookies to run. Bake in middle of moderate oven (190 Celsius) for 20-30 minutes until golden brown.

Saturday, 12 May 2012

Vegetable Patch #5

I am as proud as punch.
We actually did it!
The radishes were harvested this morning by my little budding gardener.
Heidi simply loved pulling them out of the ground, one by one.


They are gorgeous too...
Well done to us!
I'm already looking around for some ideas on cooking radishes. I'll probably be using it in a salad as well as roasting them. Definitely radishes on the menu this weekend!


Friday, 11 May 2012

DWZI - Art!

Heidi loves drawing.
And painting.
She can do it all day long and let me tell you, she is a prolific artist.
Our house is filled with her art work.
I love her use of colour, and I love her creative mind.
She is after all only 4 years old!


Happy weekend!!

You can find the Deze Week Zag Ik participants here.

Thursday, 10 May 2012

Food Photography and Styling Workshop

I had the pleasure of attending a food photography and styling workshop on Saturday. Simone and Alexandra were our teachers and tried to impart a wealth of knowledge to us in just one day.
What an experience!

It was clear from the start that I was out of my depth... I used my old SLR camera which I admit I don't use very often. Plus I am not quite an expert on aperture and shutter speed so it was a challenge for me to keep up. Then my camera tripod broke and I had to borrow one. Not the best start to the day.

The group consisted of 9 participants, all eager to learn more about photographing food and of course styling! It is amazing what a little thought into how to place a bowl of pasta can do. It's all about colours, accessories and just playing around until you get the right effect.

Trial and error.

We had lots of opportunity to practice different shots and style some dishes, as well as taking the photos in various light.

I really feel like I learnt a lot, but now it is all down to practicing and resisting the habit of just picking up my iPhone for every photo I take.

It will take time, but at least I am making a start!


Wednesday, 9 May 2012

Chocolate Chip Cookies


Who can resist a chocolate chip cookie?
I ask you.
Who?

Certainly not me, or my children, or it turns out my team at work.

My husband actually found the recipe and then baked the cookies.
A Martha Stewart recipe was bound to be good.
Oh yes.

Here is the recipe, copied from Martha Stewart's website:

Ingredients:

2 1/4 cups all-purpose flour
1/2 teaspoon baking soda
1 cup (2 sticks or 230 gram) unsalted butter, room temperature
1/2 cup granulated sugar
1 cup packed light-brown sugar
1 teaspoon salt
2 teaspoons pure vanilla extract
2 large eggs
2 cups (about 12 ounces) semisweet and/or milk chocolate chips

Directions:

Preheat oven to 350 degrees (180 degrees Celsius). In a small bowl, whisk together the flour and baking soda; set aside. In the bowl of an electric mixer fitted with the paddle attachment, combine the butter with both sugars; beat on medium speed until light and fluffy. Reduce speed to low; add the salt, vanilla, and eggs. Beat until well mixed, about 1 minute. Add flour mixture; mix until just combined. Stir in the chocolate chips.

Drop heaped tablespoon-size balls of dough about 2 inches apart on baking sheets lined with parchment paper.

Bake until cookies are golden around the edges, but still soft in the centre, 8 to 10 minutes. Remove from oven, and let cool on baking sheet 1 to 2 minutes. Transfer to a wire rack, and let cool completely. Store cookies in an airtight container at room temperature up to 1 week.

Notes:
I turned up my oven after the first batch to 190 degrees Celsius and then 10 minutes worked perfectly.
My batter yielded 45 delicious cookies :-)

Tuesday, 8 May 2012

Kids Food #18 - Chicken Drumsticks

Kids love chicken drumsticks.
I think it is because they can grab it with their hands and just eat it off the bone.
It is a little messy, but hey, I don't mind cleaning up after them as long as they eat their food and enjoy it!


I usually make a little marinade by mixing the following for about 4 chicken drumsticks:
1 tablespoon honey
2 tablespoons tomato sauce (ketchup)
2 tablespoons dark soy sauce

Cover the chicken with the mixture and let it marinate for about an hour (or as long as you can really, I just never seem to have the time...).

Bake them in a preheated oven (180 degrees Celsius) for about 45 minutes until cooked through.

Serve them hot or cold (good for picnics!).

Friday, 4 May 2012

DWZI - Little Block Town


I love my illustration class... last week we completed an assignment.
It all started with some building blocks with which we had to stage a little town.
Everyone in my class had their own ideas and interpretation of the assignment.

Here is my illustration:


Happy weekend everyone!


Thursday, 3 May 2012

Egg and Potato Pie

A few weeks ago I wrote a post about the lovely Easter brunch we had this year.
My friend Tip made a wonderful egg and potato pie from Sweet Paul Magazine.
She served it with a side salad and some bread.
It was perfect.
Scroll down to see the recipe.
I really hope you try it!

Recipe:

1 tablespoon olive oil
1 tablespoon butter
2 onions, finely chopped
2 spring onions, thinly sliced
salt and pepper, to taste
2 large sheets of puff pastry
plain flour
1 large potato, thinly sliced
60 gram prosciutto (or any nice ham)
1 tablespoon finely chopped thyme
7 eggs

Serves 6 people

1. Preheat the oven to 180 degrees Celsius
2. Heat the oil and butter in a large pan and saute the onions and spring onions until soft
3. season with salt and pepper
4. roll out the puff pastry so that it covers an ovenproof dish. You might have to use two sheets
5. Use a little plain flour so the pastry does not stick to the surface
6. Layer the onions, potato, ham and thyme in the dish
7. crack the eggs and place on top
8. make some strips of left over pastry and place on top
9. bake until golden and crispy, about 45 - 60 minutes
Serve warm

Thank you sweet Paul :-)

Wednesday, 2 May 2012

Kids Food #17 - Tuna Fish Cakes

Last night we made tuna fish cakes.
I cannot remember which children's cookbook I found it in originally...  you know, I tend to take an idea and then just improvise. So forgive me for not being very exact with the measurements below.

Basically you boil 3 or 4 potatoes until nice and tender. Mash them real fine.
Now add a can of tuna, mix in 2 eggs and a handfull of finely chopped parsley.
Mix well and then form balls that fit nicely in your palm.
Heat up some oil in a non-stick pan and add the tuna cake balls.
Flatten them until they resemble a patty and cook about 3 minutes per side, until they are heated through and have a golden colour.

The kids liked them and the grown ups too.
Next time I'm going to experiment by adding things like peas, corn, spring onions, etc.
Yummy!


Tuesday, 1 May 2012

Easy Shortbread

My husband just cannot resist baking cookies. I think it comes from the fact that his grandmother was a master cookie baker. She would bake for her family, the church and the whole neighbourhood.

A quick and easy shortbread recipe on Nigella Lawson's website seemed like the perfect cookie to make, mostly because it required very few ingredients... (3 to be exact!).

It was a big success. Clearly he has his grandmothers genes.
And now the usual battle is raging for me to resist eating more than one. Resist, resist, resist.


Here is a link to the recipe on Nigella's website.

Makes 10 - 12


INGREDIENTS
150g plain flour
100g margarine or butter
50g castor sugar

METHOD
Preheat oven 160C, Gas mark 6.
Cream together the butter and sugar in a bowl. Gradually mix in the flour. Using your hands knead the mix together into a smooth ball.
Roll out to about 1/2 cm thick. Cut out your shapes and place on baking tray.
Bake for 10-15min. Sprinkle with a little sugar while they cool.


Related Posts Plugin for WordPress, Blogger...