Showing posts with label Baking. Show all posts

Monday, 29 September 2014

Apple Pie - the Italian Version

Last week one of my neighbours invited the kids and I around for some apple pie. While my girls played with her daughter we enjoyed our cappuccino's with this delicious apple pie. I knew right away that I had to bake this and do it soon.

Lucky me, the opportunity presented itself yesterday when Heidi received her B diploma for swimming. Of course I already bought the apples last week at the weekly market in town... just in case you see.

We enjoyed a late afternoon celebratory slice of pie (although it is a bit like cake) and everyone was very happy indeed.


My neighbour found the recipe on smulweb.nl (in Dutch), here is a copy of it in English:

Ingredients:
150 gram butter
150 gram sugar
4 eggs
500 gram apples
150 gram self raising flour
the zest and juice of 1 lemon
dash of salt

Method:
Preheat the oven to 180°C.

Peel and core the apples, then cut into thin slices and cover with the lemon juice.
Melt the butter and let it cool slightly.
Place the sugar, salt, lemon zest and 4 eggs in a bowl and beat well, until mixed and frothy (for lack of a better word!).
Mix the butter into the apples and then add the flour and mix together.
Now add the sugar mixture to the apple mixture and mix well.

Grease and line a spring tin of about 28 ΓΈ cm and pour the batter into it.

Bake the apple pie for about 40 -50 minutes until cooked.
Switch off the oven and let it rest for another 5 minutes inside the oven.

Remove from the oven and cover with a sprinkling of icing sugar (which I chose not to do!).

Friday, 26 September 2014

Martha Stewart's Red Velvet Cupcakes

I was on a roll with baking a few weeks ago so who could blame me for baking cupcakes. Red velvet cupcakes... not once but twice I made them and both times I was very happy with the result.

Being a Martha Stewart recipe you would expect it to be easy to do and indeed it was. I was quite happy using the gel paste food colouring because you need to use a lot less than you might think to achieve that deep rich red colour. Delicious!


Here is  a link to the recipe and here is a copy:

INGREDIENTS

2 1/2 cups cake flour (not self- rising), sifted
2 tablespoons unsweetened Dutch-process cocoa powder
1 teaspoon salt
1 1/2 cups sugar
1 1/2 cups vegetable oil
2 large eggs, room temperature
1/2 teaspoon red gel-paste food color (I used 1.5 teaspoons of gel)
1 teaspoon pure vanilla extract
1 cup buttermilk
1 1/2 teaspoons baking soda
2 teaspoons distilled white vinegar
Cream Cheese Frosting (I used the frosting from the red velvet cake I baked based on the delicious magazine recipe)

DIRECTIONS

STEP 1
Preheat oven to 180 degrees Celsius. Line standard muffin tins with paper liners. Whisk together cake flour, cocoa, and salt.
STEP 2
With an electric mixer on medium-high speed, whisk together sugar and oil until combined. Add eggs, one at a time, beating until each is incorporated, scraping down sides of bowl as needed. Mix in food color and vanilla.
STEP 3
Reduce speed to low. Add flour mixture in three batches, alternating with two additions of buttermilk, and whisking well after each. Stir together the baking soda and vinegar in a small bowl (it will foam); add mixture to the batter, and mix on medium speed 10 seconds.
STEP 4
Divide batter evenly among lined cups, filling each three-quarters full. Bake, rotating tins halfway through, until a cake tester inserted in centers comes out clean, about 20 minutes. Transfer tins to wire racks to cool completely before removing cupcakes. Cupcakes can be stored overnight at room temperature, or frozen up to 2 months, in airtight containers.
STEP 5
To finish, use a small offset spatula to spread cupcakes with frosting.


Monday, 8 September 2014

Red Velvet Cake

I finally baked a red velvet cake! For my birthday, because it isn't every day you turn 40...
The cake turned out really well. I was happy and as such ate way too much of this cake. But it wasn't a very easy cake to bake. A few things didn't work out as I had hoped and I'm still not sure why my cake didn't rise as much as I expected. I probably should have looked for an easier recipe but regardless I will certainly find an excuse to bake this cake again.

The frosting is a winner, in fact my husband wants only this frosting for all future cakes. Let me not think about the calories involved. Let's not go there. The only thing you need to know is that this cake is fabulous. Enough said.


Here is a link to the recipe from delicious magazine and here is a copy:

Ingredients
200g unsalted butter, softened, plus extra to grease
235g plain flour, plus extra to dust
400g caster sugar
1 tsp vanilla extract
4 large free-range eggs, separated
30g cornflour
1 tbsp baking powder
2 tbsp cocoa powder
235ml buttermilk
60ml red food colouring (we like Silver Spoon)
1½ tsp white wine vinegar
1½ tsp bicarbonate of soda
For the frosting
300ml double cream
600g full-fat cream cheese (we like Philadelphia, see Tip)
500g mascarpone
300g icing sugar
White chocolate holly leaves and gold sugared almonds to decorate

Method
1. To make the sponges, preheat the oven to 180°C/fan160°C/gas 4, then grease, dust with flour and base-line 3 x 20cm loose-bottomed cake tins. In a large mixing bowl, cream the butter and caster sugar together with an electric hand whisk for 5 minutes or until pale and fluffy. Add the vanilla and the egg yolks, one at a time, beating well after each addition.
2. In a second large mixing bowl, combine the flour, cornflour, baking powder and cocoa. In a third bowl, mix the buttermilk with the red food colouring. Sift a third of the dry ingredients into the butter mixture, then pour in a third of the buttermilk and mix together until just combined. Repeat this process with the remaining dry ingredients and buttermilk.
3. In a large, clean bowl, whisk the egg whites with a pinch of salt until they form fairly firm peaks. Add to the cake mixture, a quarter at a time, folding gently with a large metal spoon until just incorporated.
4. In a small bowl, mix the vinegar and bicarbonate of soda until it bubbles. Gently fold into the cake mixture, then quickly pour into the tins and smooth the tops. Bake for 40 minutes or until a skewer pushed into the middle of each sponge comes out clean.
5. Leave the cakes to cool in the tins for 10 minutes, then turn out onto wire racks to cool completely. Cut each sponge in half horizontally to create 6 rounds.
6. To make the frosting, whip the cream in a large bowl until you have medium-firm peaks, then set aside. In a separate bowl, beat the cream cheese, mascarpone and icing sugar together until stiff, then fold through the whipped cream.
7. To assemble the cake, put a sponge on a platter and spread with a layer of frosting. Top with a second sponge, then repeat until all 6 sponges are layered with frosting. Use the remaining frosting to cover the top and sides of the cake, smoothing with a palette knife as you go. Finally, decorate the top with white chocolate holly leaves and gold sugared almonds. Chill the cake for a few hours before slicing; it will keep in the fridge for four days.


Wednesday, 26 March 2014

Malva Pudding Again

It really is the best South African dessert ever.
No matter what you do you cannot go wrong with it.
Just follow the recipe and leave it to bake in the oven for an hour.
Most importantly you need to make the sugar syrup to pour on top once the pudding comes out of the oven.

Sweet, sugary, calorific Malva pudding heaven.
As long as you serve it with vanilla ice cream, of course.


Here is my mom's recipe.

Ingredients:
1 cup flour
1 cup milk
0.5 cup sugar
1.5 tablespoons vinegar
1 tablespoon apricot jam
1 tablespoon baking powder
1 tablespoon bicarbonate of soda
1 egg
a pinch of salt

Syrup ingredients:
125 gram butter
1.5 cups milk
1 cup sugar

Serves 4 - 6 (you can keep the portions small because it is a very rich dessert!)

Method:
Preheat the oven to 180 degrees Celsius and grease an oven dish.
Beat the egg and the sugar together until pale.
Add everything except the milk and bicarbonate of soda and mix well.
Then add the milk in which the bicarbonate of soda has been dissolved and mix together.
It is quite a runny batter.
Pour into the greased oven dish and bake for one hour until dark and baked through.
Insert a skewer and if it comes out clean then you know it is done.
In a saucepan, bring the syrup ingredients to the boil and stir until the sugar has dissolved.
Remove the pudding from the oven and prick some holes into the pudding with the skewer.
Now pour the syrup over the pudding.
It will be absorbed into the pudding within a few minutes...

Serve while warm, either with custard or vanilla ice cream.


Monday, 10 March 2014

Cronut

I finally decided to try a cronut.
When I found them in the local supermarket I thought I might as well buy one.
Of course my husband never even heard of a cronut and since it was a bit of a food fad recently I enlightened him. It is a croissant mixed with a doughnut. Funny, right?

It is pretty tasty.
The kids loved them.
So much that they keep asking for more and I keep saying no.
No, no, no.

Good as it may taste it certainly doesn't do my weight any favours ;-)

Have a great week everyone!


Friday, 17 January 2014

Fondant Fun

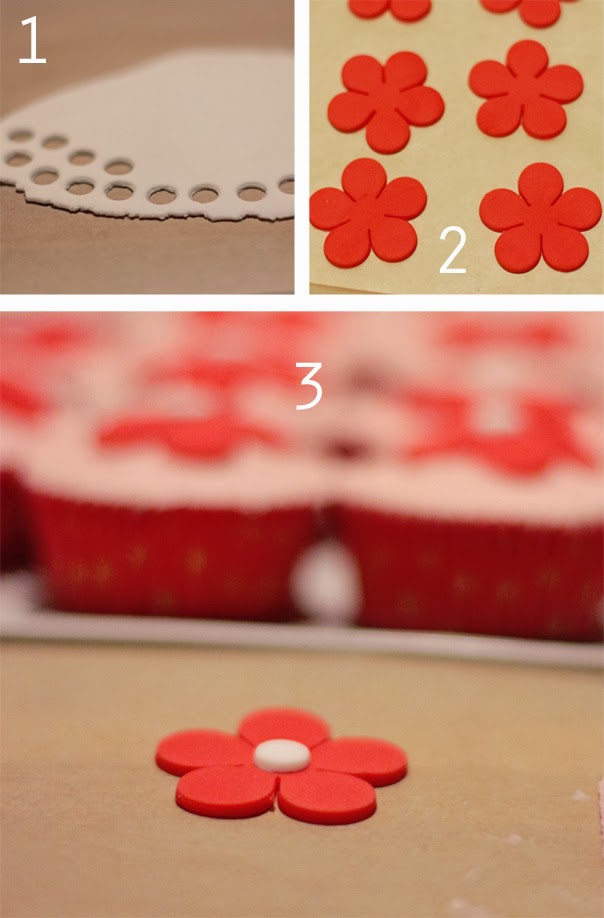
If you are ever at a loss for ideas on how to decorate cupcakes then fondant is your answer.
You can buy it just about anywhere these days.
It comes in a wide range of colours.
And it is just like playing with clay!

Of course it helps if you have a few gadgets / tools/ shape cutters to speed up the process.
I had a daisy shaped fondant cutter which I bought years ago and finally had the chance to use it. I also used my alphabet cookie cutter shapes to cut out Heidi's name. Cool right?
I even gave the kids a piece of fondant to play with and it took them a very long time before they figured out it is edible :-) Of course once they realize it you will have to act quickly and remove the fondant from their sticky little fingers before they eat it all...

Hope you have a fun filled weekend ahead!


Wednesday, 15 January 2014

The Easiest Cookie Dough

This is such an easy cookie dough that I have to share it with you. Three ingredients and that's it.
Flour, icing sugar and lots of butter.

This is the dough I used for Heidi's birthday party and it was a big success. I also felt good about the fact that it did not contain any eggs since these days parents are very fussy about their kids eating raw eggs in dough or batter (not me though!). So I decided to play it safe.

It really is a great dough and the kids loved working with it and eating it. The baking time really depends on how thick you roll out the dough and with 7 kids we had a variety of cookie shapes and sizes. I just let them do what they wanted really. I suggest sticking to basic cookie cutter shapes since the dough tends to spread a little in the oven which is not ideal for intricate designs. The cookies are great as is, or if you want you can always make a thin icing to decorate them.


I found the dough on learning4kids.net and it is definitely a winner!

Here is a link to the recipe and here is a copy:

Ingredients:
300g softened butter
1 cup icing sugar
3 cups plain flour

Method:

  1. Mix butter and icing sugar. 
  2. Add flour and mix well.
  3. Knead cookie dough on top of  baking paper until smooth.
  4. Place in the fridge to rest for 15 minutes.
  5. Roll out flat with a rolling pin on baking paper.
  6. Use your favourite or themed cookie cutters and press firmly onto the flat cookie dough.
  7. Repeat until all dough has been used.
  8. Bake at 180 degrees for 15 minutes or until golden brown.
Make sure you keep an eye on the cookies in the oven since baking time might depend on how thick your cookies are!

P.S. I had some left over cookie dough and added chocolate chips to it, wrapped it in a tube format and stuck it in the freezer for a rainy day. Will let you know how it turns out!


Friday, 10 January 2014

Cookies!

Heidi and I came up with this idea for her birthday party tomorrow.
It is going to be a baking party!

I'm going to make the dough and the kids will get to use cookie cutters to make their cookies.
Let's face it, they are a bunch of 5 and 6 year old kids so I'm definitely not giving them free reign in the kitchen!

I'm busy looking for the perfect dough and have found a couple of recipes which I'll try out this afternoon. Yesterday we played around with Ikea Gingerbread cookie dough.

The kids loved playing with it and we had a lot of fun however when it came to eating the cookies the kids were less than enthusiastic. I get it, gingerbread cookies are not for everyone and it would have been too easy if I could have just bought ready made dough, right? Wish me luck in finding a good dough before tomorrow!!


Have a great weekend!


Wednesday, 8 January 2014

Cupcake Treats for School

I feel like I've been baking every day. Which is not true, it has only been every week but still, I have been baking up a storm.

Heidi turned 6 on Monday and had to take treats for school. So I found a bag of funcakes cupcake mix and decided to cheat a little. You simply need to add (a lot of) eggs and butter to the mix and there you go! The muffins turned out quite well. Heidi wanted buttercream icing in shades of pink, red and purple...  I finished it with the cutest little windmill decorations from the Hema and Heidi loved it.

Since I made and decorated the cupcakes at night and we had to leave for school before sunrise the photos are not great... but you get the idea!


Just in case you missed the recipe last week, here is a copy of my standard buttercream icing:
Ingredients
• 250g unsalted butter, at room temperature
• 500g icing sugar, sifted
• a dash of milk (optional)

Method
In a food processor beat the butter for a few minutes until soft and then add half the icing sugar. Beat until smooth. Now add the rest of the icing sugar and beat until creamy and smooth. If your mixture is too stiff then you might need to add a bit of milk to loosen it slightly.
Add food colouring and beat until well combined.
Have fun decorating the cup cakes!

Friday, 3 January 2014

Victoria Sponge Cupcakes

A party is not a party unless you have cupcakes, right?
I decided to bake some Victoria Sponge cupcakes based on Jamie Oliver's recipe.
Since I was on a roll with the buttercream icing I could not resist keeping to a rose theme in shades of pink. Pretty predictable but they were a big hit with the kids!


Here is a copy of the recipe mentioned above, except I did not add lemon zest and I used butter cream icing instead of a fruit icing.
Ingredients:
for the sponge
• 225g unsalted butter, at room temperature, plus extra for greasing
• 225g caster sugar
• 4 large eggs, preferably free-range or organic
• 225g self-raising flour, plus extra for dusting

for the buttercream icing
• 250g unsalted butter, at room temperature
• 500g icing sugar, sifted
• a dash of milk (optional)

Method:
• Preheat the oven to 190ΒΊC/375ΒΊF/gas 5
• Beat the butter and sugar together in a food processor, until very light and fluffy
• Add the eggs one at a time, beating each one in well before you add the next
• Sift in the flour and fold the mixture together
• Place 18 paper cake cases into muffin tins
• Use tablespoons to evenly divide the mixture between the paper cases
• Put the muffin tins into the oven and bake for 15 minutes
• You can check to see if the cakes are cooked by sticking a cocktail stick right into one of them
• Remove it after 5 seconds and if it comes out clean they’re cooked; if it’s slightly sticky they’ll need a bit longer, so put them back in the oven for another 5 minutes, or until cooked through and golden on top
• If you cook them for too long, though, they will go dry so keep an eye on them
• Remove the cakes from the tins and transfer to a wire rack to cool

Once cooled you can ice the cupcakes.
In a food processor beat the butter for a few minutes until soft and then add half the icing sugar. Beat until smooth. Now add the rest of the icing sugar and beat until creamy and smooth. If your mixture is too stiff then you might need to add a bit of milk to loosen it slightly.
Add food colouring and beat until well combined.
Have fun decorating the cup cakes!


Tuesday, 31 December 2013

Chocolate Brownies

I went on a baking spree for the girls' birthday party. At the last moment I decided to bake brownies, you know, just in case the rest of the cakes were not enough... so off my husband went to buy more eggs and I found a Jamie Oliver recipe that looked perfect.

As usual I adapted the recipe and let me tell you I was very happy with the result! The brownies were rich and sticky and every so decadent. Definitely a winner.

So if you need something sweet for your new years eve (or any other day of the year) then make these brownies!


I found the recipe on jamieshomecookingskills.com which I must admit is a very user friendly website with lots of step by step instructions and photos.

You can find the original recipe on the website above. Here is my version with the modified ingredients:

Ingredients
• 200g good-quality dark chocolate (I used 100gram 71% cocoa solids and 100gram 80% cocoa solids)
• 250g unsalted butter
• 100g walnuts, roughly chopped (optional)
• 100g chocolate chips (optional)
• 80g cocoa powder
• 65g plain flour
• 1 teaspoon baking powder
• 350g caster sugar (I used 150 gram light brown sugar and 200 gram caster sugar)
• 4 large eggs

Method
Preheat your oven to 180ΒΊC/350ΒΊF/gas 4
Line a 20 x 30cm rectangular baking tin with greaseproof paper
Smash up the chocolate into small pieces
In a large bowl over some simmering water, melt the butter and the chocolate and mix until smooth
Add the nuts, if you’re using them, and stir together
In a separate bowl, mix together the cocoa powder, flour, baking powder and sugar
Add this to the chocolate and nut mixture
Stir together well
Beat the eggs and mix in until you have a silky consistency and lastly add chocolate chips (if using)
Pour your brownie mix into the baking tray, and place in the oven for around 25 - 35 minutes
You don’t want to overcook them so, unlike cakes, you don’t want a skewer to come out all clean
The brownies should be slightly springy on the outside but still gooey in the middle
Allow to cool in the tray, then carefully transfer to a large chopping board and cut into chunky squares


Monday, 30 December 2013

Stella's 3rd Birthday

Yesterday my sweet Stella turned 3 years old.
We had a few friends over for cake and it was lovely.
I baked a lot. A butter cake, Victoria sponge cupcakes and brownies.
Yes, I might have gone a little overboard... but it was so worth it!

Heidi and Stella both loved the cakes and the party. I just loved having so many friends over to share in the fun and eat the cake!

Here is the rose birthday cake which I thought turned out pretty well:


It was actually quite easy to do the icing - here is a link to a tutorial from iambaker.net.

I made a very simple butter cake and the buttercream icing was made with a ratio of 1:2 butter to icing sugar. I used food colouring and baked three cakes in three shades of pink and then coloured the icing accordingly. Fun!!!


Wednesday, 4 December 2013

Orange Loaf Misadventure

So I decided to bake an orange loaf. Not something I've tried before but you know me, I'll try just about anything when it comes to baking. Well perhaps Sunday was not a good baking day for me because things went wrong.

Turns out the oven was too hot and the batter burst through the crust half way through baking. That was a first for me but google tells me that's what happened. OK. I decided to just let the loaf continue baking and added 10 minutes just to be sure. When a skewer came out clean I figured the ugly looking orange loaf was done. Ugly indeed.

I kind of followed two recipes using the batter from this one and the glaze from this one and perhaps that was also a mistake? My glaze just did not work either. I drizzled it over the still warm loaf and let it rest for a while. Then I cut it open because I had to try it, I just had to know what it looked like inside. It was fine, in fact it tasted fine but I felt like something was missing... The kids enjoyed it and that is a good sign.

Will I make it again? No way. I'm all done with oranges in baking and that's that.


Thursday, 21 November 2013

Upside Down Pear Cake

I bought a lot of pears and the kids decided not to eat them.
Why? Well who knows.
The pears were sweet and delicious and I should know because I had to eat a lot of them.
So instead of cleaning the house I decided to bake a cake with the last three pears.
Good idea right?

The cake turned out delicious! I could probably have baked it 10 or 15 minutes longer to caramelise the pears more, but I was worried that the kids might not like it if the pears became too dark.

And did I mention this is a weight watchers recipe?
Yep, I'm trying to be very good so there you have it.
It also means that I have to restrain myself from eating the whole cake...


Here is a copy of the recipe in Dutch. If you want an English version then you'll have to mail me or leave me a comment!

1 koffielepel(s) Olie, zonnebloem
2 eetlepel(s) Bruine suiker
2 koffielepel(s) Kaneel
400 g Del Monte Halve peren op sap, drooggedept
6 eetlepel(s) Margarine, 60% vet  (I used butter and not margarine)
125 g Basterdsuiker, wit
2 middelgroot/middelgrote Ei
125 ml Zure room
125 g Zelfrijzend bakmeel

Instructies
Verwarm de oven voor op 180 ΒΊC. Vet een cakeblik in met een klein beetje olie. Bedek de bodem en de zijkanten met bakpapier. Bestrooi de bodem van het cakeblik met de bruine suiker en 1 koffielepel kaneel. Snijd de peren in schijfjes en verdeel ze over de besuikerde bodem.

Gebruik de mixer voor het mixen van de margarine met het suiker. Voeg één voor één de eieren toe, blijf mixen. Doe de zure room en het bakmeel bij het geheel en roer ook de resterende koffielepel kaneel erdoor.

Schep de cakemix bovenop de peren in het bakblik. Strijk glad met de achterkant van een lepel. Bak 1 uur in de oven of tot de cake gaar is. Test dit door een sateprikker in de cake te prikken. Laat de cake 5 minuten afkoelen voordat je deze op de kop uit het bakblik laat glijden.

Snijd de cake in plakjes en serveer warm.

Tuesday, 12 November 2013

Basic Muffins

Two weeks ago I had two friends drop by for coffee.
It was wonderful to catch up and chat and exchange ideas.
I whipped up a batch of muffins before they arrived and it went down very well with our cappuccinos. Since I had a few strawberries just hanging around I decided to chop them up and throw them in the batter. Not sure that it worked that well although nobody complained. Especially not my kids when they came home from school and devoured the remaining muffins!


Here is a link to the recipe which I found on King Arthur Flour's website.
Here is a copy - I added a handful of diced strawberries and my baking time was 25 minutes:

King Arthur Flour's Basic Muffins

2 cups All-Purpose Flour
1/2 cup sugar
1/2 teaspoon salt
1 tablespoon baking powder
1 cup milk
1/4 cup vegetable oil or softened butter (optional)*
2 large eggs

*If you leave the oil out, you can reduce the calories in your muffins by about 30%; the flavour will still be excellent, but muffins won't be quite as tender, and won't keep as well should you happen to have any left over.

Preheat your oven to 500°F (250C).

Blend together the dry ingredients as long and as vigorously as you want. If you use a little whole wheat flour in your mixture, it's easy to tell when everything is thoroughly mixed.

Beat the liquid ingredients together -- milk, oil or butter, and eggs -- until they are light.

Pour wet ingredients into dry ingredients. Take a fork or wire whisk and blend the two for 20 seconds -- no more! The secret to light and tender muffins lies in this final blending. It's OK if you've left some lumps that look as if they want more stirring; they really don't. So, no matter how hard it is, resist the impulse.

Fill cups of a lightly greased muffin tin two-thirds to three-quarters full. Place muffins in the oven and immediately drop temperature to 400°F* (200C). Bake for 15 to 20 minutes, or until muffins test done. Yield: 12 muffins, 24 mini-muffins, or six "crown" muffins.

*When you put muffins in a very hot oven and immediately drop the temperature, you help create the high peaks that make them so appealing.

Tuesday, 29 October 2013

Cupcakes

My kids have a really sweet tooth... and I indulge them occasionally by baking something on the weekend with them. We baked cute cupcakes three weeks ago and decorated them with a yoghurt icing. The icing was not quite what I expected but thats what you get when you experiment. 

Luckily the kids were happy with the colour and I managed to get a photo of one before we ate them all...


Monday, 28 October 2013

Basic Scones

In a moment of madness I decided to bake scones for the very first time in my life. Turns out it is pretty easy. The trick is to not overwork the dough. Try and resist the urge to work and knead it. The less you work it, the better they will be.

We enjoyed our scones as lunch with tea, jam, strawberries, blue berries and whipped cream. I also had a lot of fun taking photos of the scones... my poor family had to wait at least 10 minutes before I allowed them to tuck in. Next time I'm going to try to bake savoury scones!


Here is a link to the recipe from taste.com.au and here is a copy of it:

Ingredients:
plain flour, for dusting
3 cups self-raising flour
80g butter, cubed
1 to 1 1/4 cups milk
jam and whipped cream, to serve

Method:
Step 1
Preheat oven to 200°C. Lightly dust a flat baking tray with plain flour. Sift self-raising flour into a large bowl.
Step 2
Using your fingertips, rub butter into flour until mixture resembles breadcrumbs.
Step 3
Make a well in the centre. Add 1 cup of milk. Mix with a flat-bladed knife until mixture forms a soft dough, adding more milk if required. Turn onto a lightly floured surface. Knead gently until smooth (don't knead dough too much or scones will be tough).
Step 4
Pat dough into a 2cm-thick round. Using a 5cm (diameter) round cutter, cut out 12 rounds. Press dough together and cut out remaining 4 rounds. Place scones onto prepared baking tray, 1cm apart. Sprinkle tops with a little plain flour. Bake for 20 to 25 minutes or until golden and well risen. Transfer to a wire rack. Serve warm with jam and cream.


Thursday, 3 October 2013

Cinnamon Banana Bread

I know what you are thinking.
How many banana breads can this woman bake...
Who knows. A trillion?

This time round I felt like experimenting a little and I happen to come across Orangette's blog. She has a lovely way of writing about food and her recipes sound great. So I had to try one.

The banana bread recipe is very straight forward and I like the addition of the cinnamon.
However it is quite a sweet banana bread and if I make it next time I might reduce the sugar and even consider not adding the topping.

The strangest thing happened while I was measuring the ingredients. The kids were running around, Stella started crying and I turned around to give her a quick hug and then I went back to baking. Except I could not remember how many cups of flour I added. Was it one or one and a half? So I added a dash more flour and it doesn't seem to have caused any harm because the banana bread came out of the oven beautifully dark, moist and delicious.

The kids loved it too, but then again they clearly take after me when it comes to my banana bread obsession.


Here is a link to the recipe and here is a copy with my notes:

Banana Bread with Cinnamon Crumble Topping from Orangette
Adapted from Bakesale Betty and Bon AppΓ©tit, September 2008

For bread:
1 ½ cups all-purpose flour
1 cup sugar
1 tsp. ground cinnamon
1 tsp. baking soda
½ tsp. salt
1 cup mashed ripe banana (I used 2 bananas)
2 large eggs
½ cup vegetable oil
¼ cup honey
¼ cup water

For topping:
2 Tbsp. sugar
1 tsp. ground cinnamon
2 ½ Tbsp. packed dark brown sugar
Note: This was too much topping for me - I'll be using way less of this next time

Preheat the oven to 175° C.  Spray a 9 x 5 inch pan lightly with cooking spray and then line it with parchment paper, letting the excess hang over the sides. (I'm pretty sure my pan is bigger than 9 x 5 inch and I am just plan bad at conversions...)

In a medium bowl, whisk together the flour, sugar, cinnamon, baking soda, and salt. In a large bowl, whisk together the banana, eggs, oil, honey, and water. Add the dry ingredients to the wet ingredients, and stir well. Scrape the batter into the prepared pan.

In a small bowl, mix together the topping ingredients. Sprinkle them evenly over the batter.

Bake the bread until a tester inserted into its center comes out clean, about 1 hour, give or take a little. Cool the bread in the pan on a wire rack for 30 minutes. Then carefully remove the bread from the pan, taking care not to dislodge the topping. Cool completely before slicing.
(yes, let it cool if you can resist it - I couldn't!!)

Yield: 1 loaf

Monday, 30 September 2013

Old Fashioned Apple Pie

We had a lot of fun making apple pie last week. I had more than my fair share of the pie... but it was just so good. So very, very, very good. And the best part was that I didn't even have to bake it myself!

My dear husband was in a baking mood and my lovely neighbour gave me a big bag full of baking apples. A match made in heaven. My husband is not that fond of the classic Dutch apple pie so he found an American recipe that sounded good.

Of course it was a team effort. Picture this. My husband doing all the hard work and me reading the Martha Stewart recipe on my iPad and taking photos. Seems like the perfect division of labour to me! There was a little catch though... we started making the dough very avidly and then realised that there was a lot of resting time required. Like that apple pie was not hitting the oven for at least one and a half hours. Oh well, that just meant that we'd have it for dessert.

Not!! Once we finally had the apple pie in the oven I watched a video on how to make apple pie (yes, should have paid more attention up front) where it was revealed that apple pie should rest for about 6 hours or more before slicing into it.

What?!
Seriously?
Seriously.

Apparently the juices need to settle (blah, blah, blah). But for once I decided that I can be patient. And I was rewarded. That apple pie was wonderful when we sliced into it the next morning. My neighbour came around with her daughter and we had us a little apple pie party. Happiness.


Here are a few more photos of the best (and only) apple pie we've ever made:


Here is a link to the Martha Stewart recipe and here is a copy with my notes:

INGREDIENTS

Apple Pie:
2 tablespoons all-purpose flour, plus more for dusting
(Pie Dough) Pate Brisee
12 Granny Smith apples, peeled, cored, and sliced (I used baking apples since that's what I had!)
3/4 cup sugar, plus additional for pie top
Zest and juice of 1 lemon (I might use slightly less lemon juice next time to accommodate my kids)
1 1/2 teaspoons cinnamon
1/2 teaspoon nutmeg
Pinch ground cloves (I left this out since we don't like cloves in my house)
2 tablespoons unsalted butter
1 large egg, beaten

Pate Brisee:
2 1/2 cups all-purpose flour
1 teaspoon coarse salt
1 teaspoon sugar
1 cup (2 sticks) chilled unsalted butter, cut in pieces
1/4 to 1/2 cup ice water


DIRECTIONS
Pate Brisee:
(Note: watch the video - it gives a great view on how to work this dough)
STEP 1
Place the flour, salt, and sugar in the bowl of a food processor, and process for a few seconds to combine. Add the butter, and process until the mixture resembles coarse meal, about 10 seconds. With the machine running, add the ice water in a slow, steady stream, through the feed tube, just until the dough holds together. Do not process for more than 30 seconds.
STEP 2
Turn the dough out onto a work surface. Divide in two. Place each half on a sheet of plastic wrap. Flatten, and form two discs. Wrap, and refrigerate at least 1 hour before using.

DIRECTIONS
Apple Pie:

STEP 1
Heat oven to 190 degrees Celsius. On a lightly floured surface, roll out pate brisee into two 1/8-inch-thick circles to a diameter slightly larger than that of an 11-inch plate. (I am clueless with inches so I just kind of guessed here...) Press one pastry circle into the pie plate. Place the other circle on waxed paper, and cover with plastic wrap. Chill all pastry until firm, about 30 minutes.
STEP 2
In a large bowl, combine apples, sugar, lemon zest and juice, spices, and flour. Toss well. Spoon apples into pie pan. Dot with butter, and cover with remaining pastry circle. Cut several steam vents across top. Seal by crimping edges as desired. Brush with beaten egg, and sprinkle with additional sugar.
STEP 3
Bake until crust is brown and juices are bubbling, about 1 hour. Let cool on wire rack before serving.


Tuesday, 3 September 2013

Basic Banana Bread

I decided it was time for a banana bread. I've just been craving one and the hot weather we had before we went on holiday facilitated the ripeness of all the bananas in the house. Plus I had to use up all fresh produce before we left! (okay, like I really need an excuse to bake... you know me so well.)

For a change I used the basic banana bread recipe from theKitchn. It turned out really well. Didn't even last an afternoon... but then again banana bread is one of my very favourite things to eat.
This recipe is not much different to my mothers' recipe. The main difference being the addition of some milk and using fewer bananas. 


Here is a link to the recipe and here is a copy:

Ingredients
1/2 cup butter or margarine, softened
1 cup granulated white sugar
2 large eggs
1 cup (2 medium bananas) mashed bananas
1/4 cup milk
2 teaspoons vanilla
2 cups all purpose flour
1/2 cup chopped nuts (optional)
1 teaspoon baking soda
1/2 teaspoon kosher salt

Instructions
1. Gather Ingredients - make sure everything is at room temperature.
2. Preheat your oven to 180°C and grease the pan of your choice. This recipe makes 1 loaf but also makes 6-8 muffins.
3. Add butter and sugar to bowl of mixer. Blend on low until combined and then increase speed until light and fluffy (3-5 minutes).
4. Crack and add eggs to the mixture one at a time, incorporating after each addition. Next, add bananas and blend on low until combined. Mixture will appear to curdle or separate and that's alright. If all your ingredients were at room temperature, this shouldn't occur and will keep the texture more creamy.
5. Add the remaining milk and vanilla to the mixture and mix just until combined.
6. Add the flour to the bowl and the other ingredients on top of it (sift prior if you wish). Mix on medium speed until mixture has come together and is thick and creamy. Now is the time to check the bottom of the bowl with a spatula to make sure all dry ingredients and butter has been incorporated.
7. Now is the time to stir in nuts, berries or chocolate chips if you wish.
8. Pour into prepared pan and smooth surface with a spatula. Place in preheated oven and bake for 50-60 minutes, until a toothpick comes out clean. If you use a different size pan, start checking after 20 minutes in 10 minutes increments for doneness. Some moistness in the crest that forms is fine, but actual "goop" will mean it needs to continue cooking.
9. Allow To Cool - approximately 20 minutes.
Enjoy!

Related Posts Plugin for WordPress, Blogger...